Listen up, tech enthusiasts! If you've ever wondered how to connect to your IoT devices remotely using SSH on Android without spending a dime, you're in the right place. In today's fast-paced digital world, having remote access to your smart gadgets is more than just convenient—it's essential. Whether you're a DIY tech guru or someone who loves tinkering with smart devices, this guide will walk you through everything you need to know. So, grab your favorite beverage, and let's dive in!
SSH, or Secure Shell, is your golden ticket to managing devices from afar. Imagine being able to tweak settings on your home automation system or monitor your security cameras while sipping coffee at a café. Sounds awesome, right? Well, it's not just a dream—it's a reality, and you can do it all for free on your Android device.
Now, before we get too deep into the nitty-gritty, let me assure you this isn't some complicated, tech-heavy ordeal. We'll break it down step by step, ensuring even beginners can follow along. So, whether you're a seasoned pro or just dipping your toes into the SSH pool, this guide has something for everyone.
Read also:Jeremy Pivens Journey Through Hollywood A Starrsquos Story
What Exactly is SSH Remote IoT Device Access?
Let’s start with the basics, shall we? SSH, or Secure Shell, is like a superpower for tech wizards. It’s a cryptographic network protocol that lets you securely access and manage remote devices over an unsecured network. Think of it as a secret tunnel that keeps your data safe while traveling across the internet. When we talk about SSH remote IoT device access, we're referring to using this protocol to connect to your smart devices from anywhere in the world.
Why is SSH So Important for IoT Devices?
Here’s the deal: IoT devices are everywhere, and they’re only getting smarter. From smart thermostats to security cameras, these gadgets are transforming our lives. However, managing them remotely can be a challenge. That’s where SSH comes in. It provides a secure way to control your IoT devices, ensuring your data remains protected from prying eyes. Plus, it’s free and widely supported, making it an ideal choice for budget-conscious tech enthusiasts.
Setting Up SSH on Your Android Device
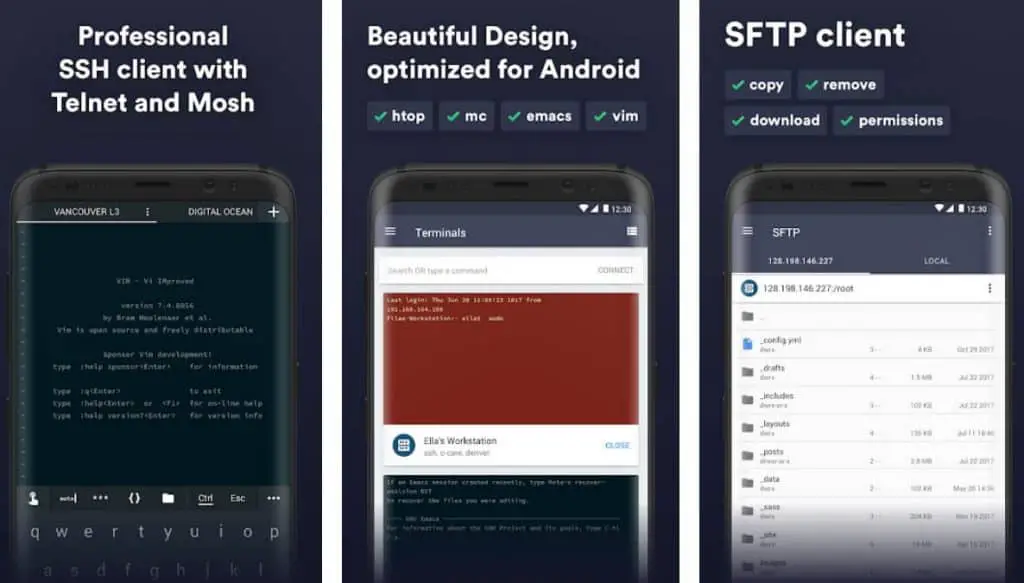
Now that you understand the basics, let’s move on to the fun part—setting up SSH on your Android. Don’t worry; it’s easier than you think. First, you’ll need to download a reliable SSH client app. There are several great options available, but some of the most popular ones include JuiceSSH and Termux. These apps are free and offer robust features to help you manage your IoT devices.
Choosing the Right SSH Client
- JuiceSSH: This app is user-friendly and packed with features. It’s perfect for beginners who want a straightforward interface.
- Termux: If you’re comfortable with the command line, Termux is a powerful tool that gives you full control over your SSH sessions.
- ConnectBot: Another solid choice, ConnectBot offers advanced features like port forwarding and key management.
Each app has its strengths, so take some time to explore and see which one suits your needs best.
Connecting to Your IoT Device via SSH
Alright, you’ve got your SSH client installed. Now what? The next step is connecting to your IoT device. This process involves a few key steps, but don’t worry—we’ll walk you through it.
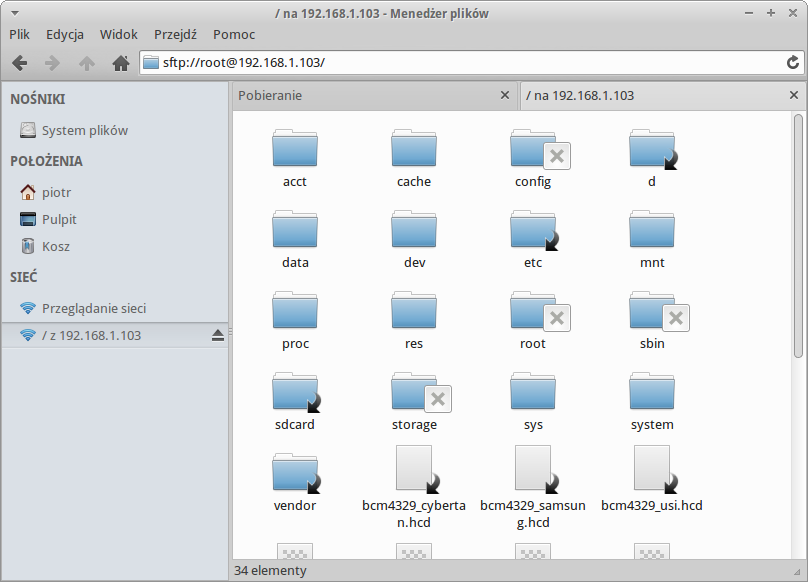
Step 1: Gather Your Device Info
Before you can connect, you’ll need to know your IoT device’s IP address and the SSH port number. Most devices use port 22 by default, but it’s always a good idea to double-check your device’s documentation.
Read also:Tarek El Moussas Love Story Discovering His Life With Heather Rae
Step 2: Enter Your Credentials
Once you have the necessary info, open your SSH client and enter the following details:
- Host: Your IoT device’s IP address.
- Port: The SSH port number (usually 22).
- Username: The login username for your device.
- Password: The corresponding password.
Hit connect, and voila! You’re now securely connected to your IoT device.
Securing Your SSH Connection
Security is paramount when it comes to remote access. While SSH is inherently secure, there are additional steps you can take to protect your connection.
Use Strong Passwords
It’s crucial to use strong, unique passwords for your IoT devices. Avoid using common phrases or easily guessable information. Instead, opt for a mix of uppercase and lowercase letters, numbers, and symbols.
Enable Key-Based Authentication
For an added layer of security, consider enabling key-based authentication. This method uses cryptographic keys instead of passwords, making it much harder for unauthorized users to gain access.
Common Issues and Troubleshooting
Even with the best-laid plans, things can go wrong. Here are some common issues you might encounter and how to fix them.
Connection Refused
If you’re getting a "connection refused" error, double-check your IP address and port number. Also, ensure that SSH is enabled on your IoT device and that any firewalls are configured correctly.
Authentication Failed
Authentication issues usually stem from incorrect login credentials. Verify that you’ve entered the right username and password. If you’re using key-based authentication, make sure your keys are properly configured.
Advanced SSH Features for IoT Devices
Once you’ve mastered the basics, it’s time to explore some advanced SSH features that can take your IoT management to the next level.
Port Forwarding
Port forwarding allows you to access services on your IoT device that aren’t directly exposed to the internet. This is particularly useful for things like web interfaces or custom applications.
SSH Tunneling
SSH tunneling creates a secure channel between your Android device and your IoT device. This is perfect for transferring sensitive data or accessing restricted networks.
Why Choose Free SSH Solutions?
In today’s world, budget matters. Thankfully, there are plenty of excellent SSH solutions available for free. These apps offer robust features without the hefty price tag, making them ideal for hobbyists and professionals alike.
Cost-Effective and Feature-Rich
Whether you’re using JuiceSSH, Termux, or ConnectBot, you’ll find that these apps deliver impressive functionality without breaking the bank. They’re regularly updated, ensuring you always have access to the latest features and security patches.
Final Thoughts and Next Steps
There you have it—a comprehensive guide to SSH remote IoT device access on Android for free. By following the steps outlined above, you can securely manage your smart devices from anywhere in the world. Remember, security is key, so always use strong passwords and consider enabling key-based authentication.
Now that you’ve got the knowledge, it’s time to put it into action. Download your preferred SSH client, connect to your IoT device, and start exploring all the possibilities. And don’t forget to share your experiences with us in the comments below. We’d love to hear how you’re using SSH to enhance your smart home setup!
Table of Contents
- What Exactly is SSH Remote IoT Device Access?
- Why is SSH So Important for IoT Devices?
- Setting Up SSH on Your Android Device
- Choosing the Right SSH Client
- Connecting to Your IoT Device via SSH
- Securing Your SSH Connection
- Common Issues and Troubleshooting
- Advanced SSH Features for IoT Devices
- Why Choose Free SSH Solutions?
- Final Thoughts and Next Steps
So, what are you waiting for? Dive in and start unlocking the full potential of your IoT devices today!