Ever wondered how you can securely connect to your IoT devices from anywhere in the world? Well, buckle up because we’re diving deep into the world of remote access. Whether you're a tech enthusiast, a hobbyist, or a professional developer, learning how to remotely access IoT devices via SSH on the web using AWS is a game-changer. This guide will walk you through everything you need to know, step by step, so you can set up your system like a pro.
Let’s face it—IoT devices are everywhere these days. From smart home gadgets to industrial sensors, the possibilities are endless. But what happens when you need to tweak your setup or troubleshoot an issue while you're miles away? That's where SSH and AWS come into play. You don't need to be a wizard to make it work—just follow along, and we'll get you there.
Now, here’s the kicker: we’re doing all of this for free! AWS offers a generous free tier that lets you experiment with their services without breaking the bank. So, whether you're just starting out or looking to scale, this guide has got your back. Let’s dive right in!
Read also:Whoopi Goldberg Shines Bright At The 2025 Oscars
Table of Contents
- Introduction to SSH
- Why Use AWS for IoT Devices?
- Setting Up Your AWS Account
- Creating an EC2 Instance
- Configuring Security Groups
- Connecting to Your IoT Device
- SSH Web Access Made Simple
- Troubleshooting Tips
- Best Practices for Remote Access
- Conclusion and Next Steps
Introduction to SSH
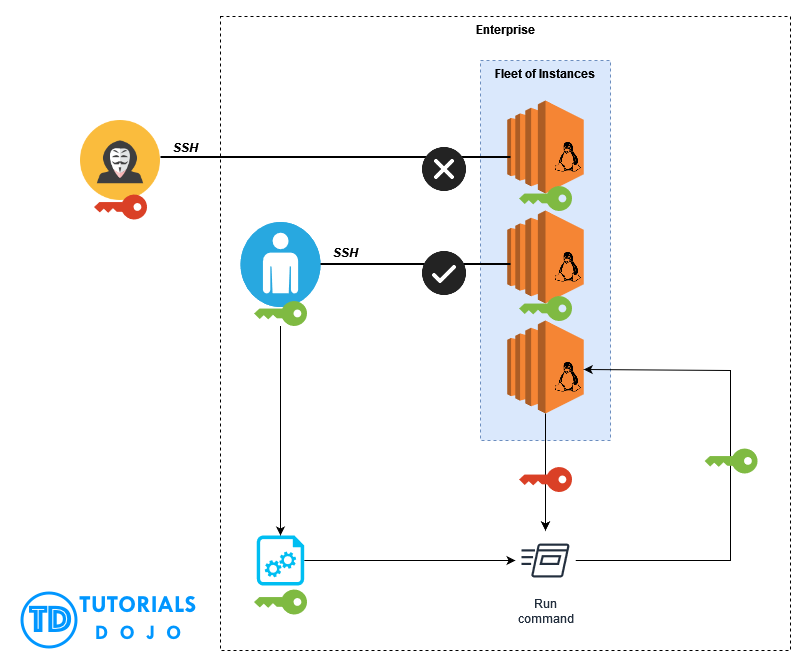
First things first, let’s talk about SSH. It stands for Secure Shell, and it’s like the secret handshake of the tech world. SSH allows you to securely connect to another computer over an unsecured network—like the internet. Think of it as a private tunnel where only you and your device can communicate without any eavesdropping.
SSH isn’t just for computers, though. It’s perfect for IoT devices too. Whether you’ve got a Raspberry Pi controlling your smart home or a sensor monitoring your garden, SSH lets you access and manage them remotely. No more physical access required!
And hey, don’t worry if you’re new to SSH. We’ll break it down step by step so you can get up and running in no time.
Why SSH Matters for IoT
IoT devices often run lightweight operating systems that don’t have fancy GUIs. That means you’ll need a command-line interface to interact with them. SSH gives you that power from anywhere in the world. Plus, it’s secure, reliable, and widely supported. What’s not to love?
Why Use AWS for IoT Devices?
AWS, or Amazon Web Services, is like the Swiss Army knife of cloud computing. It’s packed with tools and services that make managing IoT devices a breeze. But why choose AWS over other platforms? Let me tell you why:
- Scalability: AWS can handle anything from a single IoT device to thousands of them. As your setup grows, AWS grows with you.
- Security: Security is a big deal when it comes to IoT. AWS offers robust security features to keep your data and devices safe.
- Free Tier: Yep, you heard that right. AWS offers a free tier that lets you experiment with their services without spending a dime. Perfect for beginners and hobbyists.
- Global Network: AWS has data centers all over the world, which means you can access your devices from anywhere with minimal latency.
So, whether you’re building a smart home or a smart city, AWS has got the tools you need to make it happen.
Read also:Jack Nicholsons Heartwarming Return Family Steps Up To Support The Legendary Actor
Setting Up Your AWS Account
Alright, let’s get practical. The first step in this journey is setting up your AWS account. Don’t worry—it’s easier than you think. Here’s what you need to do:
- Head over to the AWS website and click on "Create an AWS Account."
- Fill in your details, including your email, name, and payment information. Don’t worry, the free tier won’t charge you unless you exceed the limits.
- Once your account is set up, log in to the AWS Management Console. This is where all the magic happens.
Pro tip: Take some time to explore the AWS console. It might seem overwhelming at first, but with a bit of practice, you’ll get the hang of it.
Claiming Your Free Tier
Before we move on, make sure you activate your AWS Free Tier. This gives you access to a bunch of services, including EC2 instances, which we’ll use to connect to your IoT devices. Here’s how:
- Go to the AWS Free Tier page and click "View Details."
- Select the services you want to use and confirm your selection.
- That’s it! You’re now ready to roll with AWS for free.
Creating an EC2 Instance
Now that your AWS account is set up, it’s time to create an EC2 instance. Think of it as a virtual server in the cloud. This is where we’ll set up SSH and connect to your IoT devices.
Here’s how you create an EC2 instance:
- In the AWS Management Console, go to the EC2 dashboard.
- Click on "Launch Instance" and choose an Amazon Machine Image (AMI). For beginners, the Amazon Linux 2 AMI is a great choice.
- Select an instance type. For the free tier, stick with the t2.micro instance—it’s free and powerful enough for most IoT projects.
- Configure your instance settings. You can leave most of the defaults, but make sure to set a meaningful name for your instance.
- Under the "Storage" section, you can adjust the size of your root volume. For now, the default 8GB should be fine.
- In the "Tags" section, add a tag to help you identify your instance. For example, you could use "Name: IoT-SSH."
- For the "Security Group," we’ll configure that in the next step.
- Finally, review your settings and click "Launch." You’ll be prompted to create or select a key pair. Download the key pair file (.pem) and keep it safe—it’s your key to accessing your instance.
Congratulations! You’ve just created your first EC2 instance. Now let’s make sure it’s secure.
Configuring Security Groups
Security groups are like firewalls for your EC2 instances. They control who can access your instance and how. For SSH access, we need to allow incoming traffic on port 22.
Here’s how you configure your security group:
- In the EC2 dashboard, click on "Security Groups" in the left-hand menu.
- Select the security group you created for your instance.
- Click "Edit inbound rules" and add a new rule.
- Set the type to "SSH" and the source to "Anywhere" (or your specific IP address for added security).
- Save your changes.
And just like that, your EC2 instance is ready to accept SSH connections. But wait, there’s more!
Testing Your Security Group
Before we move on, let’s test your security group to make sure everything is working as expected:
- Open a terminal or command prompt on your local machine.
- Run the following command, replacing `your-instance-public-ip` with the public IP address of your EC2 instance:
ssh -i "your-key-pair.pem" ec2-user@your-instance-public-ip - If everything is set up correctly, you should be able to log in to your instance.
Boom! You’re now connected to your EC2 instance via SSH.
Connecting to Your IoT Device
Now that your EC2 instance is up and running, it’s time to connect it to your IoT device. This is where the magic happens.
Here’s a high-level overview of the process:
- Make sure your IoT device is connected to the internet and has an SSH server running.
- From your EC2 instance, use SSH to connect to your IoT device. For example:
ssh user@iot-device-ip - Once connected, you can manage your IoT device just like any other server.
Pro tip: If your IoT device doesn’t have a public IP address, you can use a reverse SSH tunnel to connect to it securely.
Troubleshooting IoT Connections
Sometimes things don’t go as planned. Here are a few tips to help you troubleshoot IoT connections:
- Make sure your IoT device is connected to the same network as your EC2 instance.
- Check your security group settings to ensure port 22 is open.
- Verify that your IoT device’s SSH server is running and configured correctly.
With these tips, you’ll be back up and running in no time.
SSH Web Access Made Simple
What if you want to access your IoT devices via a web browser instead of a terminal? AWS has you covered with AWS Systems Manager (SSM). It allows you to connect to your EC2 instances and IoT devices directly from the AWS console.
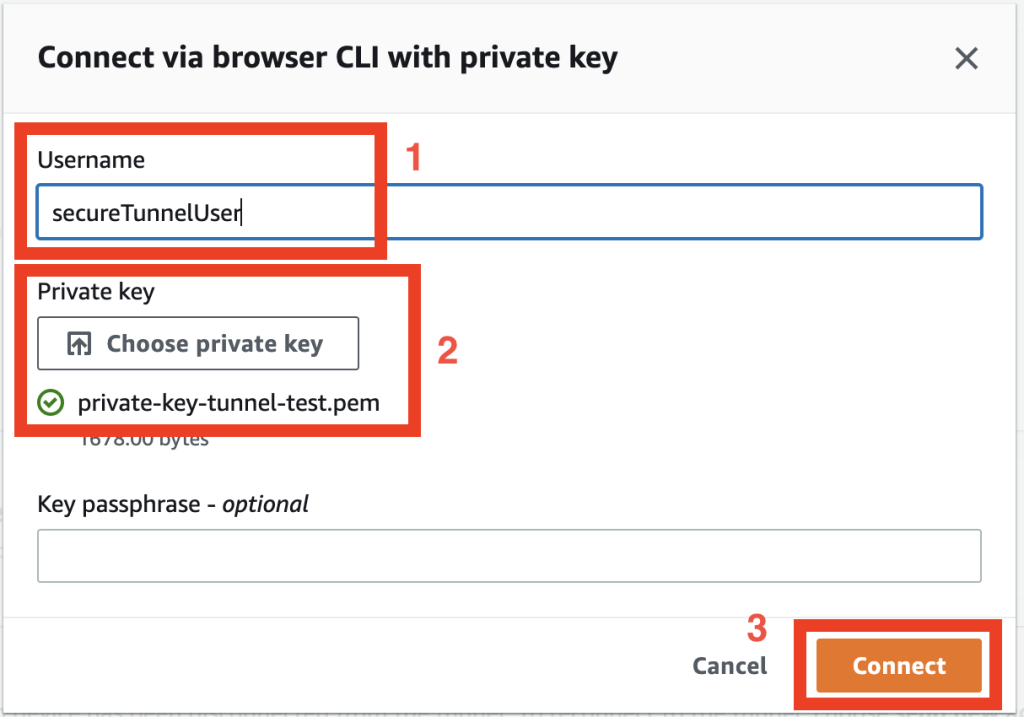
Here’s how you enable SSH web access:
- Make sure your EC2 instance is configured with the SSM agent. Most AMIs come with it pre-installed.
- In the EC2 dashboard, select your instance and click "Connect."
- Choose the "Session Manager" option and start a new session.
- From there, you can run commands and manage your IoT device just like you would in a terminal.
It’s that simple! Now you can manage your IoT devices from anywhere using just a web browser.
Benefits of SSH Web Access
SSH web access offers several advantages:
- Convenience: No need to install or configure SSH clients on your local machine.
- Security: All connections are encrypted and authenticated through AWS.
- Flexibility: Access your devices from any device with a web browser.
Whether you’re working from your laptop, tablet, or even your phone, SSH web access makes managing IoT devices a breeze.
Troubleshooting Tips
Even the best-laid plans can go awry. Here are some common issues you might encounter and how to fix them:
- Connection Refused: Double-check your security group settings and make sure port 22 is open.
- Permission Denied: Ensure your key pair file has the correct permissions. Run
chmod 400 your-key-pair.pemto fix it. - Timeout Errors: Verify that your IoT device is connected to the internet and reachable from your EC2 instance.
Still stuck? Don’t hesitate to reach out to the AWS support community. They’re full of helpful folks who’ve been there and done that.
Best Practices for Remote Access
Finally, let’s talk about best practices for remotely accessing IoT devices:
- Use Strong Passwords: Avoid using default passwords for your IoT devices. Always set strong, unique passwords.
- Regularly Update Firmware: